Deploying nestjs with UI admin panel
Today, I’d like to take you on an exciting journey into the world of development using NestJS and the creation of a UI admin panel without the need for deep frontend knowledge. We’ll explore how to easily and effortlessly set up an administrative interface, allowing you to focus on the more critical aspects of your project.
This article is intended for developers who value their time and want to avoid the hassle of building an admin panel from scratch. We’ll dive into the realm of NestJS and demonstrate how to create a powerful and visually appealing web application with an administrative interface that simplifies managing your application.
<p>This article serves as a concise guide to integrating Payload CMS and NestJS. It’s important to note that it doesn’t claim to be a code-writing recommendation or an architectural approach. Instead, it aims to provide practical information on how to effectively combine two powerful tools to streamline the development of your application.</p>
What Do We Need?
To create an impressive administrative panel, we’ve chosen Payload CMS. This open-source project has gained wide popularity and garnered numerous stars on GitHub. Payload CMS provides powerful tools for data management and interaction within your NestJS application.
Key Features of Payload CMS:
- MongoDB Support: Payload CMS is designed to work seamlessly with the MongoDB database, making it an ideal choice for various projects, from small personal blogs to large corporate applications.
- High Flexibility: One of the key features of Payload CMS is its outstanding flexibility in customization. You can easily adapt the system to your unique needs and project requirements.
- Out-of-the-Box Functionality: Payload CMS offers a plethora of built-in features, significantly speeding up the development process.
Installation
To install Payload CMS, we will be using the built-in “blank” template from the create-payload-app package.
$ npx create-payload-app

Welcome to Payload. Let's create a project!
√ Project name? ... nestjs-and-payload-cms
√ Choose project template » blank
√ Enter MongoDB connection ...

mongodb://127.0.0.1/payload-cms-and-nestjs Creating project in ./nestjs-and-payload-cms √ Dependencies installed
√ .env file created
√ Payload project successfully created

$ cd nestjs-and-payload-cms
Installing nestjs
npm i @nestjs/core @nestjs/platform-express reflect-metadata
Integrating nestjs into the newly created payload cms template
Let’s create a server folder and write a standard “hello world controller”
mkdir ./src/server
mv ./src/server.ts ./src/server/index.ts
src/server/app.service.ts
import { Injectable } from '@nestjs/common';

@Injectable()
export class AppService {
  getHello(): string {
    return 'Hello World!';
  }
}
src/server/app.controller.ts
import { Controller, Get, Inject } from "@nestjs/common";
import { AppService } from "./app.service";

@Controller()
export class AppController {
  constructor(@Inject(AppService) private readonly appService: AppService) {}

  @Get()
  getHello(): string {
    return this.appService.getHello();
  }
}
src/server/app.module.ts
import { Module } from "@nestjs/common";
import { MongooseModule } from "@nestjs/mongoose";
import { AppController } from "./app.controller";
import { AppService } from "./app.service";
import { PostModule } from "./post/post.module";
require("dotenv").config();

@Module({
  imports: [MongooseModule.forRoot(process.env.MONGODB_URI), PostModule],
  controllers: [AppController],
  providers: [AppService],
})
export class AppModule {}
Don’t forget to update our scripts in the package.json and nodemon.json
"scripts": {
    "start:dev": "cross-env PAYLOAD_CONFIG_PATH=src/payload.config.ts nodemon",
    "start:prod": "cross-env PAYLOAD_CONFIG_PATH=dist/payload.config.js NODE_ENV=production node dist/server/index.js",
    "build:payload": "cross-env PAYLOAD_CONFIG_PATH=src/payload.config.ts payload build",
    "build:server": "tsc",
    "build:prod": "npm run copyfiles && npm run build:payload && npm run build:server",
    "copyfiles": "copyfiles -u 1 "src/**/*.{html,css,scss,ttf,woff,woff2,eot,svg,jpg,png}" dist/",
    "generate:types": "cross-env PAYLOAD_CONFIG_PATH=src/payload.config.ts payload generate:types"
}
{
  "ext": "ts",
  "exec": "ts-node src/server/index.ts"
}
Let’s change the original server.ts file
import { NestFactory } from "@nestjs/core";
import express from "express";
import payload from "payload";
import { AppModule } from "./app.module";

require("dotenv").config();
const app = express();

const start = async () => {
  // Initialize Payload
  await payload.init({
    // # Секретный ключ, который использует для шифрования токенов авторизации
    secret: process.env.PAYLOAD_SECRET,
    // # Строка для подключения к mongoDB
    mongoURL: process.env.MONGODB_URI,
    express: app,
    onInit: async () => {
      payload.logger.info(`Payload Admin URL: ${payload.getAdminURL()}`);
    },
  });

  const nest = await NestFactory.create(AppModule);
  await nest.init();
  app.use(nest.getHttpAdapter().getInstance());

  app.listen(3000);
};

start();
Here we initialize our nestjs in the future, various settings can be added here, for example swagger.
const nest = await NestFactory.create(AppModule);
await nest.init();
app.use(nest.getHttpAdapter().getInstance());
We are launching our project with the team
npm run start:dev
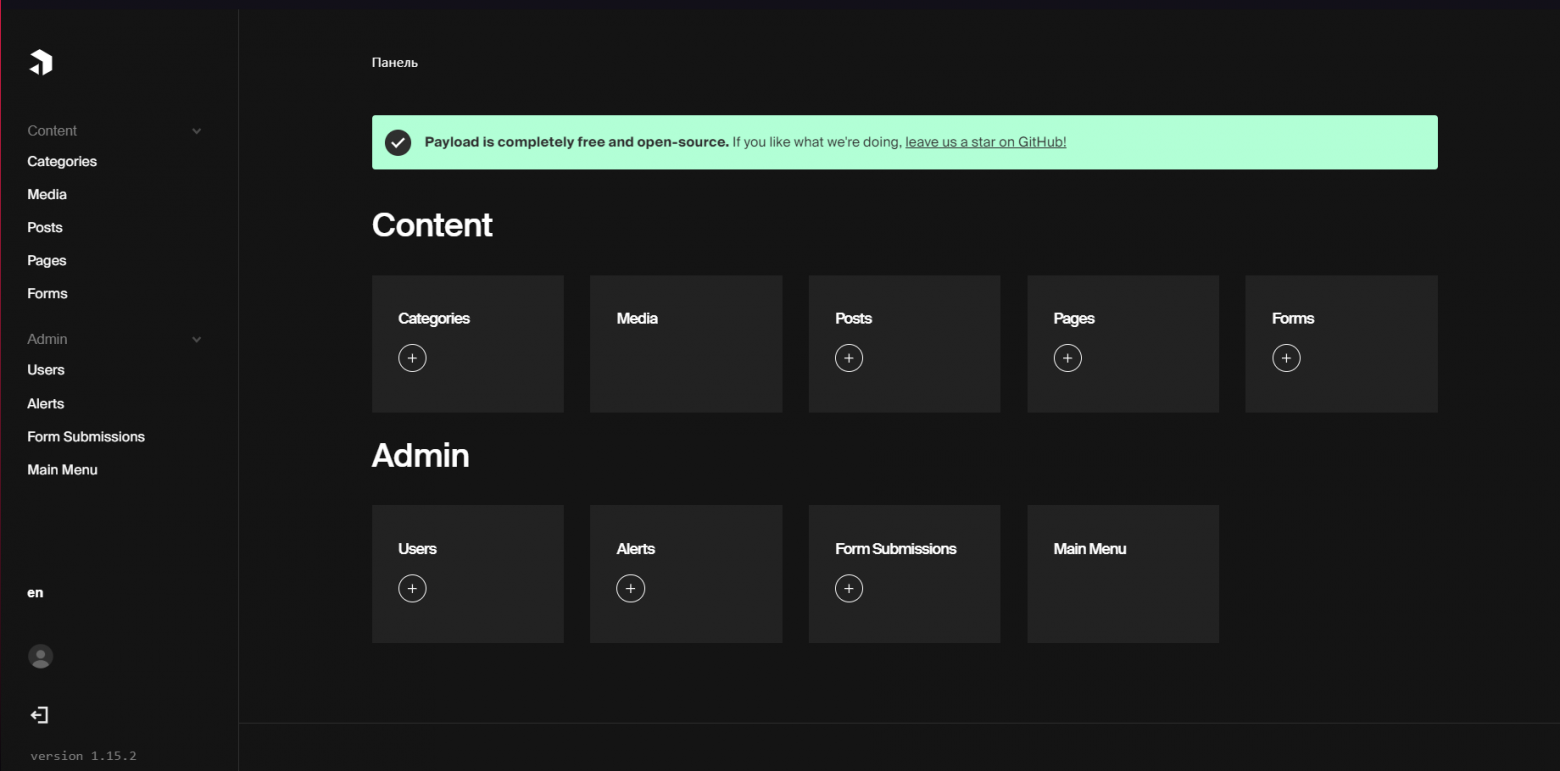
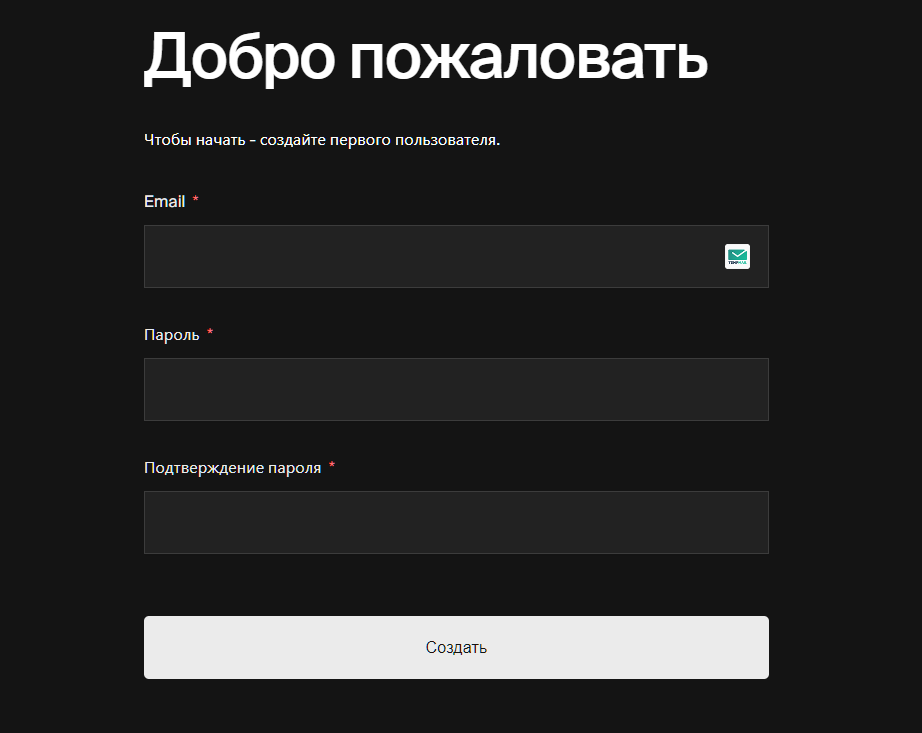
When clicking on the link http://localhost:3000/admin we will see the welcome payload page. At the address http://localhost:3000 we will have our AppController working out.
Creating a collection
I would like to show you how you can use the models that payload initializes inside the nestjs code. On the example of posts, with the exit time.
To do this, we first need to describe the collection inside the payload.
srccollectionspost.collection.ts
import { CollectionConfig } from "payload/types";
import Users from "./Users";

export const PostCollection: CollectionConfig = {
  slug: "posts",
  admin: {
    useAsTitle: "title",
  },
  versions: true,
  fields: [
    {
      name: "title", // # Create a mandatory field 'title' of type 'text'
      type: "text",
      label: "Title",
      required: true,
    },
    {
      // # Create a mandatory field 'content' of type 'richText', stored as JSON in the database
      // # Serialization of this field uses the slatejs library
      name: "content",
      type: "richText",
      label: "Content",
      required: true,
    },
    {
      // # Create a 'author' field of type 'relationship', linked to the 'users' collection
      // # 'Users' represents the administrators of our CMS
      name: "author",
      type: "relationship",
      relationTo: Users.slug,
      hasMany: false,
      admin: {
        position: "sidebar",
      },
    },
    {
      // # Create a 'status' field of type 'select', which can have values 'draft' or 'published'
      // # Used to indicate the status of the post, whether it has been published or not
      name: "status",
      type: "select",
      label: "Status",
      defaultValue: "draft",
      options: [
        {
          label: "Draft",
          value: "draft",
        },
        {
          label: "Published",
          value: "published",
        },
      ],
      admin: {
        position: "sidebar",
      },
    },
    {
      // # Create a 'datePublished' field of type 'date' to store the publication date of the post
      name: "datePublished",
      type: "date",
      label: "Date Published",
      required: true,
      admin: {
        position: "sidebar",
      },
    },
  ],
};
srcpayload.config.ts – initialize the described collection
import { payloadCloud } from "@payloadcms/plugin-cloud";
import path from "path";
import { buildConfig } from "payload/config";
import { PostCollection } from "./collections/post.collection";
import Users from "./collections/Users";

export default buildConfig({
  admin: {
    user: Users.slug,
  },
  // # Добавляем с collections PostCollection
  collections: [Users, PostCollection],
  typescript: {
    outputFile: path.resolve(__dirname, "payload-types.ts"),
  },
  plugins: [payloadCloud()],
});
To change the status, we will write a simple logic, when the publication date becomes in the past tense, we change the status to published.
srcpostpost.service.ts
import { Model } from "mongoose";
import payload from "payload";
import { Post } from "payload/generated-types";
import { PostCollection } from "../collections/post.collection";

export class PostService {
  private readonly _postModel: Model;
  constructor() {
    this._postModel = payload.collections[PostCollection.slug].Model;
    setInterval(this.handlerPublisherPost.bind(this), 1000 * 60 * 60);
  }

  public async handlerPublisherPost() {
    const result = await this._postModel.find({
      status: "draft",
      datePublished: { $lte: new Date() },
    });
    for (const item of result) {
      item.status = "published";
      await item.save();
    }
  }
}
Initialize the post scheme from the payload cms.
private readonly _postModel: Model;
constructor() {
  this._postModel = payload.collections[PostCollection.slug].Model;
  setInterval(this.handlerPublisherPost.bind(this), 1000 * 60 * 60);
}
To get the types, write the command:
npm run generate:types
The handler checks once an hour whether there are posts with the draft status and in the past tense, if there is, translates the post status to published
public async handlerPublisherPost() {
  const result = await this._postModel.find({
    status: "draft",
    datePublished: { $lte: new Date() },
  });
  for (const item of result) {
    item.status = "published";
    await item.save();
  }
}
Initialize the written service
srcpostpost.module.ts
import { Module } from "@nestjs/common";
import { PostService } from "./post.service";

@Module({
  providers: [PostService],
})
export class PostModule {}
srcserverapp.module.ts
import { Module } from "@nestjs/common";
import { PostModule } from "../post/post.module";
import { AppController } from "./app.controller";
import { AppService } from "./app.service";
require("dotenv").config();

@Module({
  imports: [PostModule],
  controllers: [AppController],
  providers: [AppService],
})
export class AppModule {}
Results
We have successfully combined two powerful tools with you, in which these two can facilitate the writing of your project. Creating an administrative panel will not require a lot of time now. When adding an administrative panel to a project, we add to it not only cost, but also solidity.
If you are interested in payload, let me know! I will tell you and share even more experience in setting it up!
Repository with code – [click]
Decentralized NFT Marketplace | Part 1
In this article, we will look at what it is:
- What is decentralization?
- What does the NET Marketplace consist of?
- What role does NFT play?
- Creating a collection
- We sell TAE on opensea
- Sources?
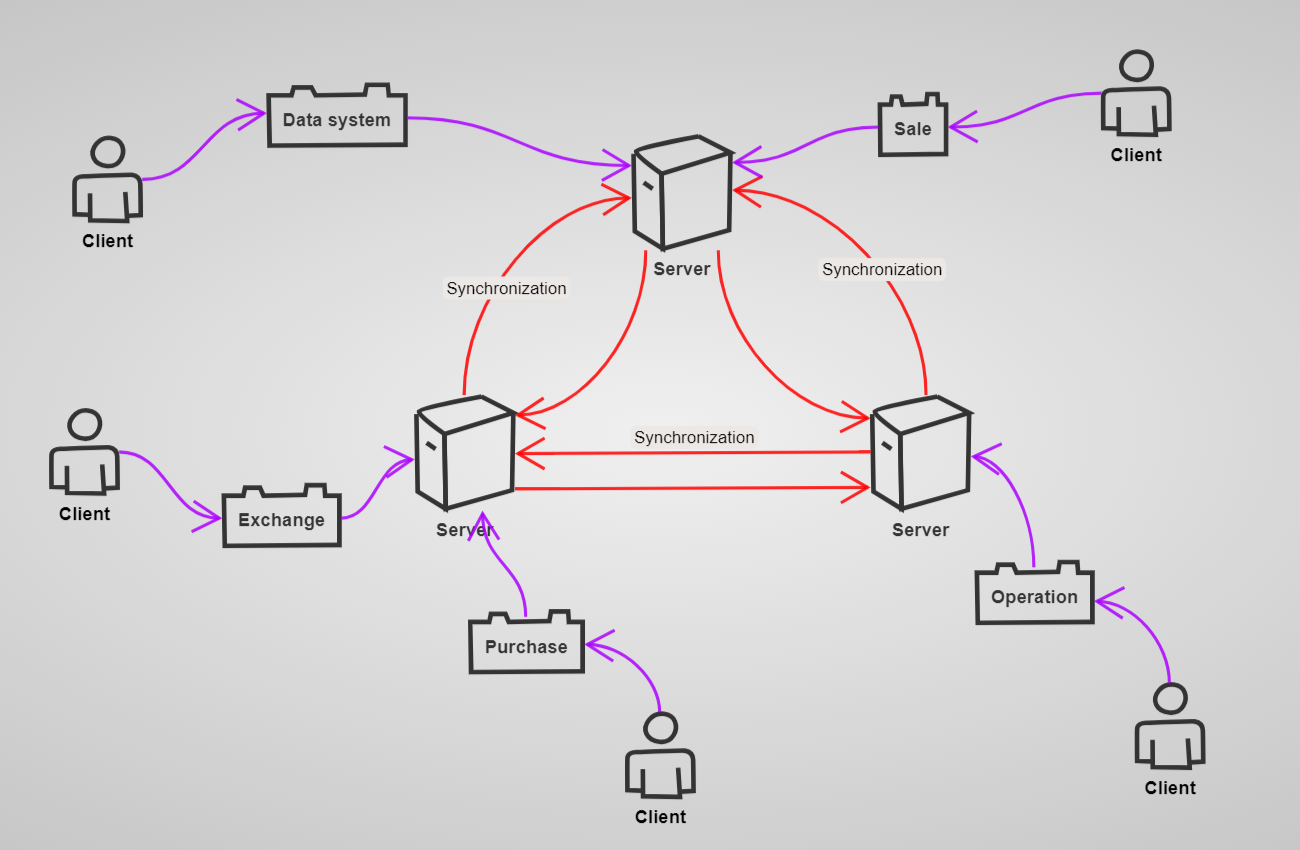
Decentralization
In simple words, it is like an online marketplace for digital unique things, where there is no single owner or management company. All transactions are carried out on the basis of "smart contracts" on the blockchain, which makes the process more transparent and ensures the security of transactions. Participants can buy, sell and exchange their unique digital assets without intermediate intermediaries, which emphasizes the idea of decentralization.
What is the difference between decentralization and centralization?
Centralization: Everything is concentrated in one place, where there is a “boss” or control center who makes the main decisions. The rest simply follow the instructions of this "boss".
Decentralization: Everything is divided into parts, each of which works independently. There is no one big “boss” who decides everything. Everyone does their part
NFT Marketplace
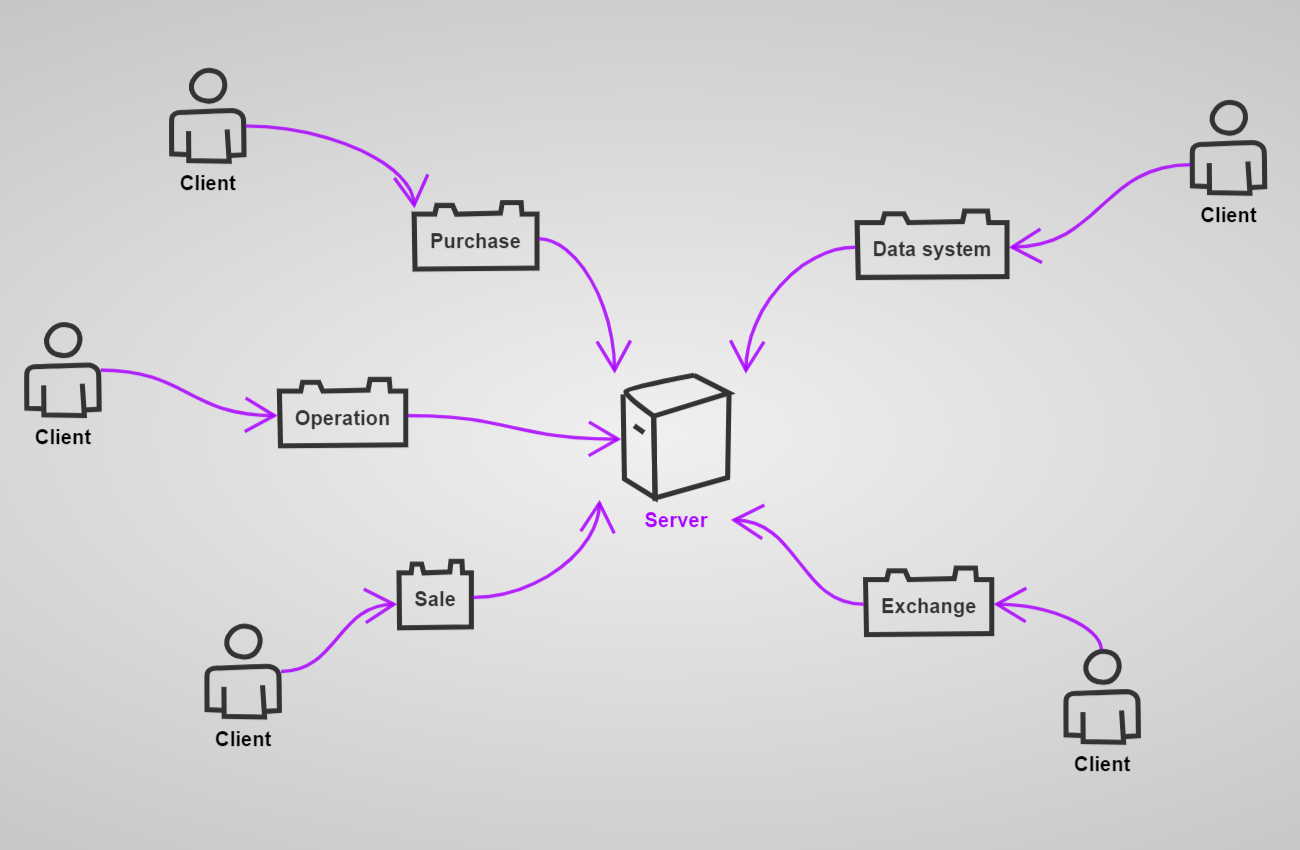
The NFT Marketplace consists of several key contracts that enable various aspects of the functioning of the digital unique asset market. Here are the main components of the NFT Marketplace:
- NFT contract (eg ERC-721): Responsible for creating and managing unique tokens (NFTs), defining their properties and tracking ownership.
- Marketplace Contract: Provides marketplace functionality including listing, buying, and selling NFTs. Associated with the NFT contract and manages transactions
- Payment management contract: Processes payments for NFT sales, accepts funds from buyers and pays sellers
All of these contracts interact with each other to provide the functionality of the NFT Marketplace, from creating unique tokens to conducting transactions and managing various aspects of the platform.
NFT in the world of decentralization
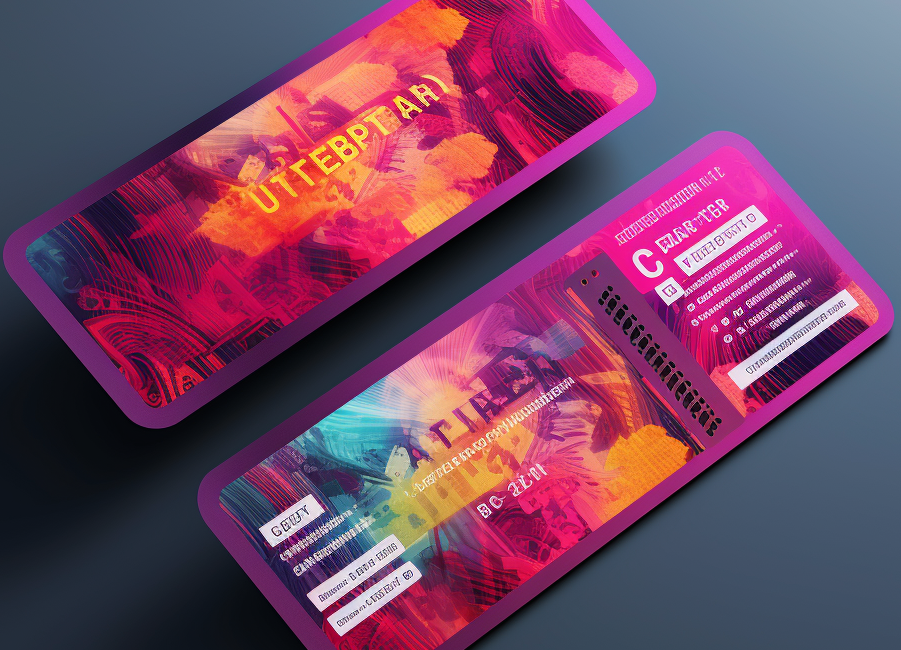
NFT- it's like a digital ticket confirming that you have something unique on the Internet. It could be digital picture, video, music or something else. When you buy NFT, you are essentially buying a record in a database that says you are the owner of this unique digital content. It's like having an artist's autograph, only in digital form
At certain sites NFT may provide additional bonuses, access to a unique resource, or increased income.

Collection
Collection - it's like your digital gallery or a set of unique digital things on the Internet. Instead of, to hold physical items, you collect unique digital files, such as pictures, videos or music, that are captured as NFTs. Each item in your collection has its own uniqueness and authenticity, confirmed by a record in the blockchain. It's like a virtual gallery of your digital treasures.
To create a collection, you can use ready-made solutions, which are huge. In this article I would like to dive deeper into this process, and I will begin our dive with two components:
Smart solidity contract
Solidity contract- who will be responsible for creating a collection and adding your own to this collection NFT.
All links to source code will be provided at the end of the article.
Let's write our own collection contract that will store our assets:
We create a contract and inherit from EIP ERC721
contract Collection {

  constructor(

    string memory name_,

    string memory symbol_

  ) ERC721(name_, symbol_) {}

}
- constructor(string memory name_, string memory symbol_): This is a constructor function that is executed once when a smart contract instance is created. It accepts two strings (name_ and symbol_) that represent the name and symbol for our NFTs
- ERC721(name_, symbol_): This indicates that our Collection smart contract inherits ERC-721 functionality. ERC-721 is a standard that defines the basic functionality for creating unique and non-fungible tokens (NFTs) on the Ethereum blockchain.
- Thus, when creating a new instance of the Collection smart contract, we specify its name and symbol, and this contract will work with non-fungible tokens in accordance with the ERC-721 standard.
We create a token counter - this will be our unique ID for the token
import "@openzeppelin/contracts/utils/Counters.sol";contract Collection {
///LIBRARIES
using Counters for Counters.Counter;///INIT VAR
Counters.Counter private _tokenId;///...
- import "@openzeppelin/contracts/utils/Counters.sol";: This line of code imports the Counters library from
OpenZeppelin. The Counters library contains tools for working with counters and will be used to create unique token IDs - using Counters for Counters.Counter;: This line tells the smart contract that it will use functionality from the Counters library to operate on an object of type Counters.Counter. This is done in order to use the methods and variables defined in the library with the object _tokenId.
- Counters.Counter private _tokenId;: This is the definition of the _tokenId variable of type Counters.Counter. This counter will be used to assign unique IDs to each generated token in the collection. The private keyword indicates that this variable is only accessible within this
smart contract.
This allows the contract to create new tokens with unique numbers and track their supply.
Adding a token minting function to the contract
function mint(address to, string calldata tokenURI) external {

  _mint(to, _tokenId._value);

  _setTokenURI(_tokenId._value, tokenURI);

  _tokenId.increment();

}
- function mint(address to, string calldata tokenURI) external {: This is a declaration of a function called mint that takes two parameters: to (the address where the new token will be sent) and tokenURI (the unique resource identifier for the new token). The external keyword indicates that the function can be called from outside the smart contract.
- _mint(to, _tokenId._value);: This line of code calls the _mint function, which is provided by the ERC-721 standard and adds a new token to the collection. The first argument to indicates who owns the new token, and the second argument _tokenId._value indicates the unique identifier of the new token.
- setTokenURI(_tokenId._value, tokenURI);: This line of code calls the _setTokenURI function, which sets the unique resource identifier for the new token. The first argument _tokenId._value specifies for which token the URI is being set, and the second argument tokenURI is the actual URI of the new token.
- _tokenId.increment();: This line of code increments the _tokenId counter, ensuring that the next token created will receive a new unique ID.
The mint function creates new unique tokens, assigns them unique identifiers, and sets their corresponding URIs in your ERC-721 collection.
Client for interaction with solidity contract
As a client, I chose the ethers web library. Instead of the client, you can use any other solution
Signer initialization
const signer: JsonRpcSigner = await new ethers.providers.Web3Provider(

    window.ethereum

).getSigner();
Signer provides the ability to sign Ethereum transactions using your private key. Private key- This is an important part of your wallet and is used to prove that you own a specific Ethereum address.
Thus, Signer in ethers allows you to sign transactions, which is a necessary step to send funds or perform other operations on the Ethereum blockchain
Initializing the contracts instance
const address = "0x16f865b5Ce0B9894167bAFF999f86c7D47AB242f"

// The ABI can be obtained by compiling the contract or by reference

// https://gist.githubusercontent.com/kobylinskii-m/caef8024baab42cec220f0c51db640ac/raw/f14b72b78889d013a7f0c237e20e3398b91c73bf/Collection%2520abi

const abi = []

const contract = new ethers.Contract(address, abi, signer);
new ethers.Contract - creates a virtual connection between your code and a smart contract that exists on the blockchain
When you use new ethers.Contract, you specify the address of the smart contract and its ABI (interaction interface). An ABI is a set of rules with which your code can interact with a smart contract.
The created object then allows you to call smart contract functions from your code and receive results and events from the smart contract.
Calling the token chicank method
// The address of the token recipient

const to = "0x0Dc6bc1545A35644B8e082C76338ccF184703e55"

// Metadata Standards.

// More information: https://docs.opensea.io/docs/metadata-standards

const tokenURI = {

  "description": "Friendly OpenSea Creature that enjoys long swims in the ocean.",

  "external_url": "https://openseacreatures.io/3",

  "image": "https://storage.googleapis.com/opensea-prod.appspot.com/puffs/3.png",

  "name": "Dave Starbelly"

}

return await contract.mint(to, tokenURI);
When you use the functionmint, you generate a new unique token and give it properties that make it unique within this standard. This process is similar to how a bank issues new banknotes with unique numbers.
So the functionmint ERC-721 allows you to create and add new unique digital assets to a collection of non-fungible tokens (NFTs)
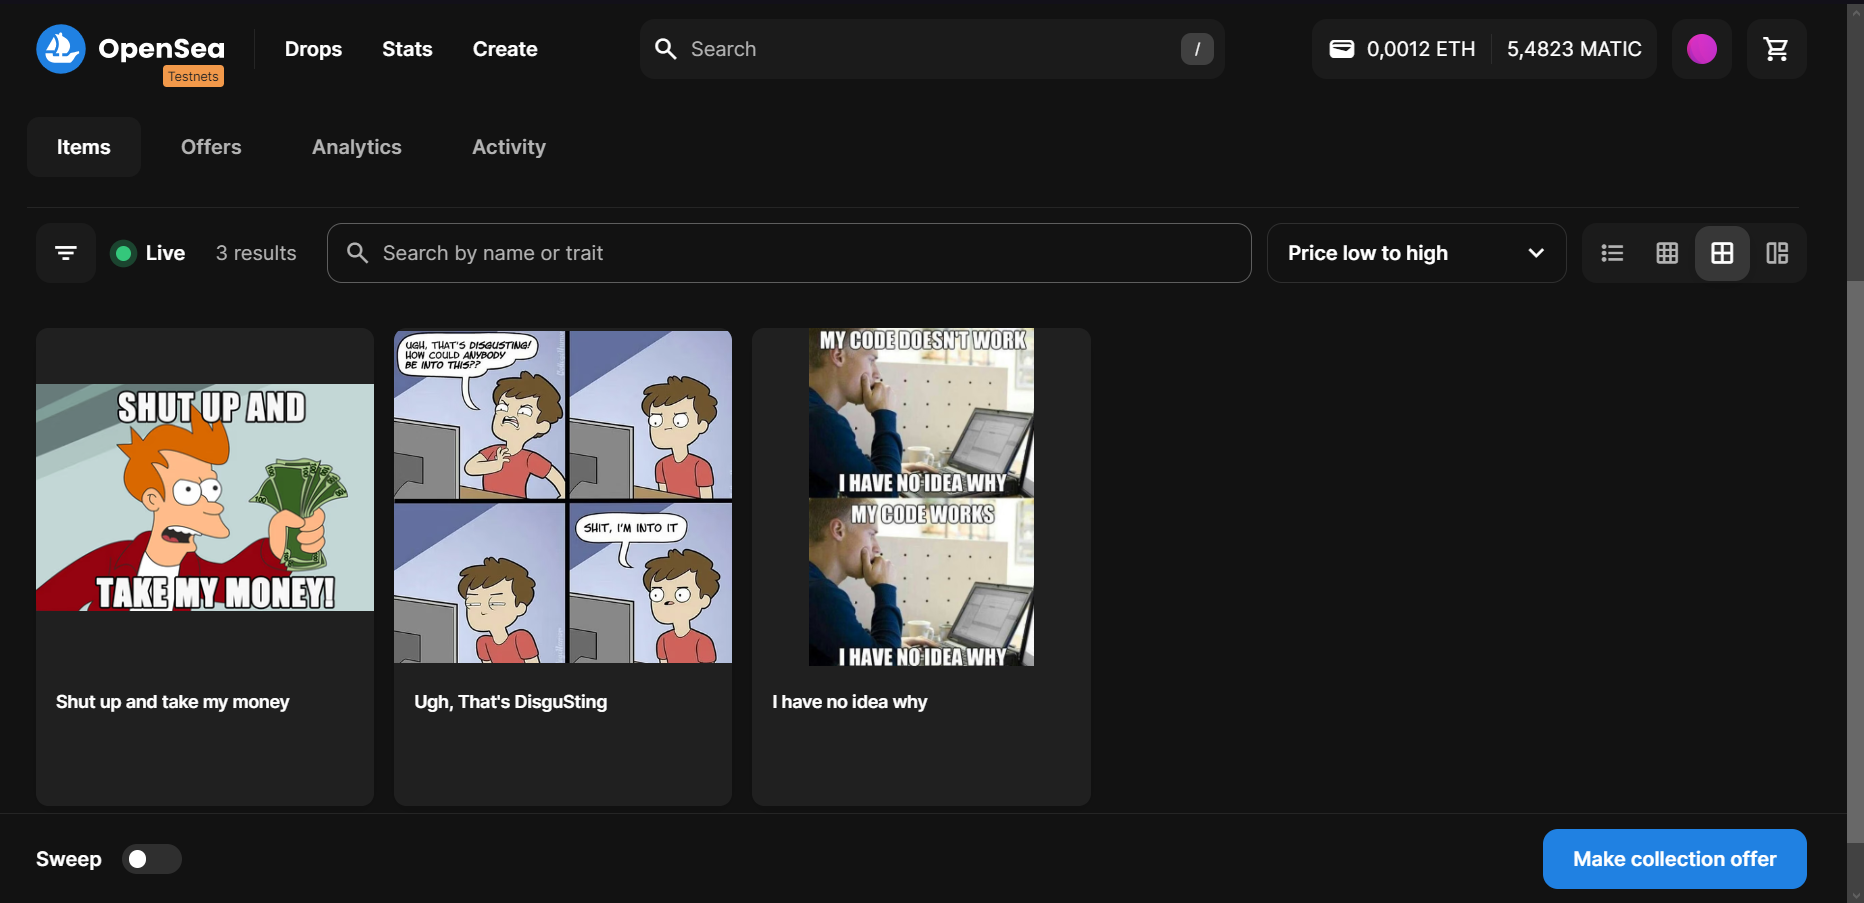
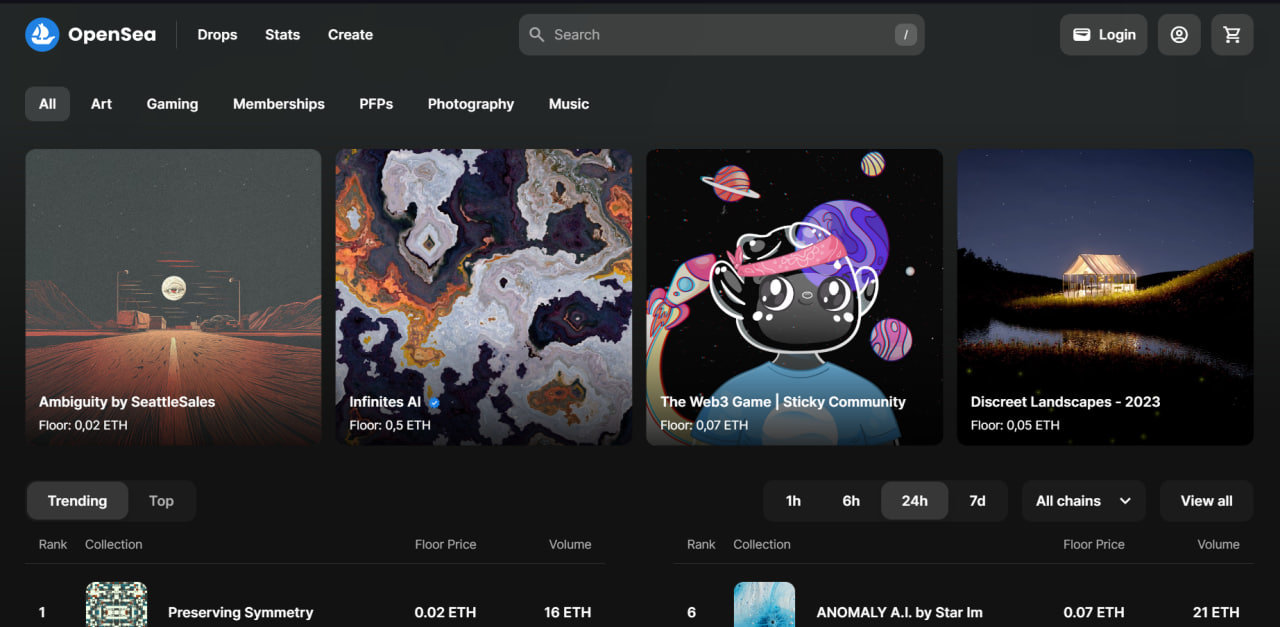
Opensea
OpenSea is an online marketplace for digital collectibles such as unique digital artificial works, video game items and other unique digital assets. Here, people can buy, sell and exchange these unique digital items using Ethereum blockchain technology and standards such as ERC-721 for non-fungible tokens (NFTs)
To create a collection, I will use already - demo clien
Creating a collection
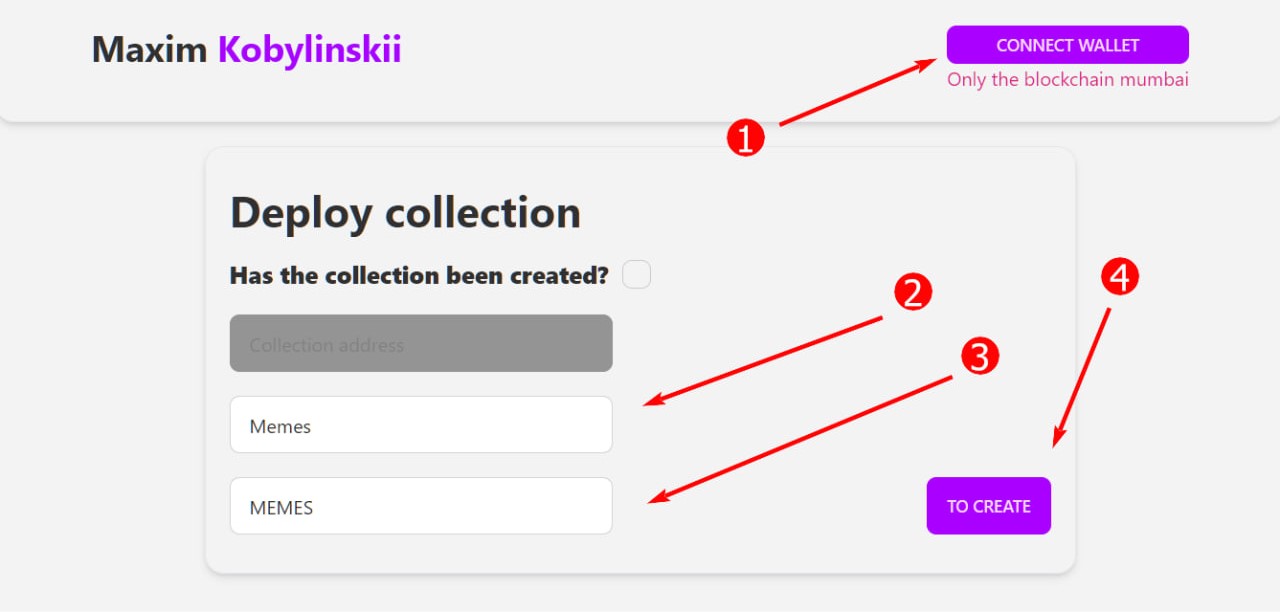
- Connect your metamask wallet and select the network MUMBAI
- Enter a name for the collection. The name will be displayed on the main page of the collection
- Enter symbol for the collection.
- Click create collection and confirm
Mintim tokens to the collection
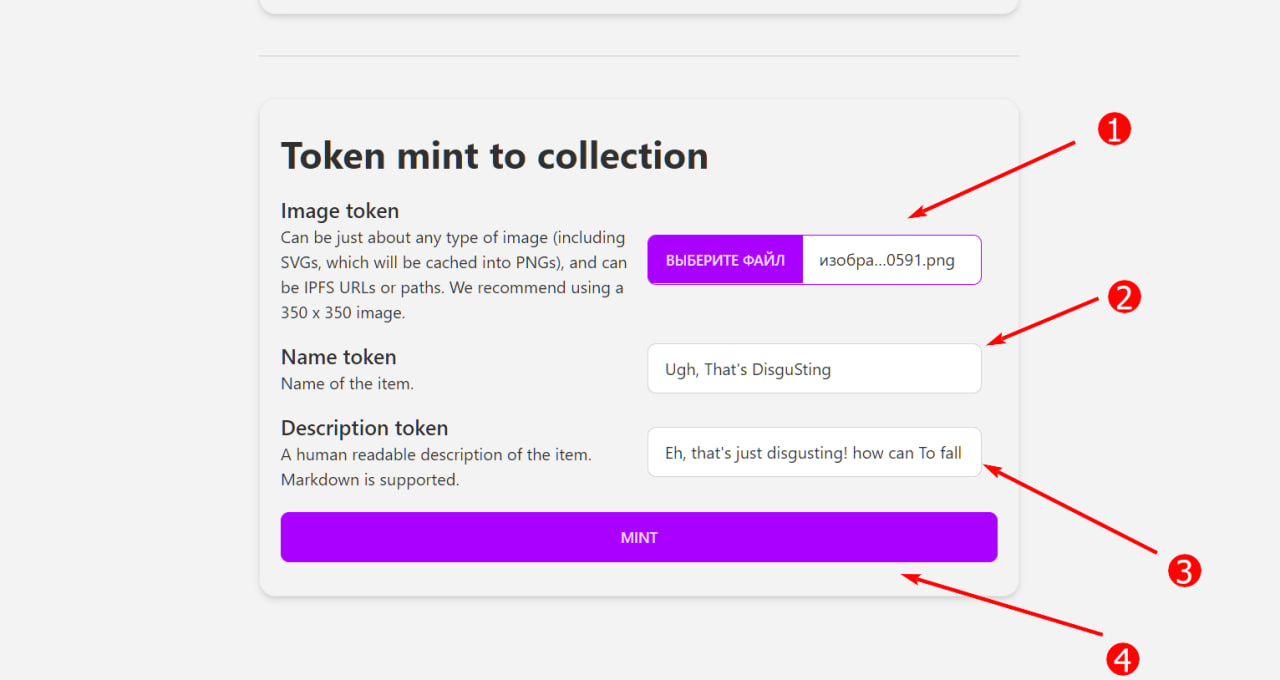
- Select the token image
- Name for the token
- Description of the token
- Click mint token and confirm the transaction